WPA-EAP TLS WiFi
After seeing this configuration deployed in enterprise I struggled to understand how it worked, so I picked up a UniFi AC-AP access point second hand and set around seeing how to do it using open source platforms.
Knowing that this required a certificate authority to work and RADIUS I figured I could eventually get it to work, but having never used RADIUS to any great degree it wasn’t without it’s pain. Eventually I did get it to a robust system and managed to deploy enterprise grade WiFi to my personal network.
Operating System: Ubuntu 18.04
Required Applications: freeradius2, openssl
Required Systems: A functioning CA, see here for a previous project.
Install Pre-Requisite Software
sudo apt-get update
sudo apt-get install openssl freeradius
Configure Your Access Point
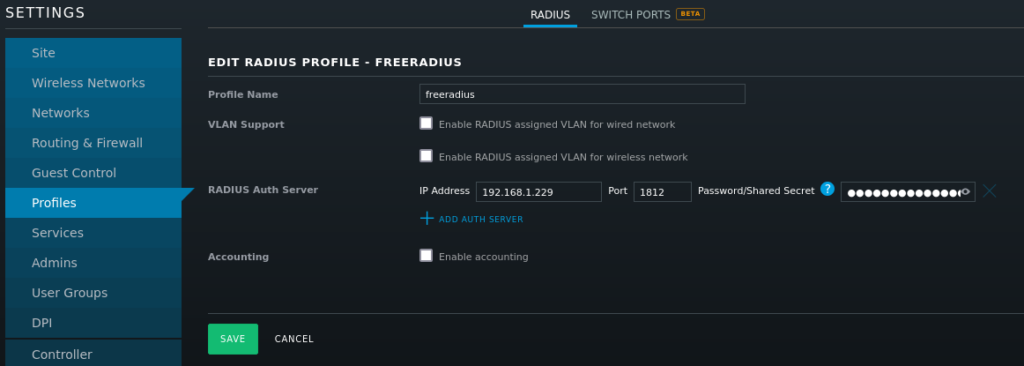
Any access point or WiFi router which supports WPA-EAP (also referred to as WPA 802.1X or WPA-Enterprise) can be used in conjunction with RADIUS. All that needs to be entered on the router is a Shared Secret. This is a random string of characters and should be very complex, ideally be be between 48-63 characters (this length is to avoid incompatibility with certain hardware).
I am using UniFi which handles this configuration as a Profile that is then assigned to devices. This can be accessed via Settings > Profiles and configured as below:

Generate Certificates and Private Key
First we will need to get a signed client certificate as well as the CA’s own certificate from our Certificate Authority (I have covered here how to set up a CA using openssl but any CA will do fine), we will need this to verify connection requests from WiFi clients.
In order to generate a CSR (Certificate Signing Request) for our RADIUS server, we’ll first need to save a configuration file:
sudo nano freeradius-csr.cnf
Enter the values below:
[ req ]
default_bits = 2048
prompt = no
encrypt_key = no
distinguished_name = dn
req_extensions = req_ext

[ dn ]
CN = radius.tinfoilcipher.co.uk
emailAddress = radius@tinfoilcipher.co.uk
O = madcaplaughs
OU = IT
L = Newcastle
ST = North East
C = GB

[ req_ext ]
subjectAltName = DNS: radius.tinfoilcipher.co.uk, DNS: radius
Save the file with CTRL+O and exit with CTRL+X
Generate a new private key and CSR with:
#--Generate CSR
openssl req -out radius.csr -newkey rsa:2048 -nodes -keyout radius.key -config freeradius-csr.cnf

#--Move key to private keys dir
sudo mv radius.key /etc/ssl/private/radius.key
sudo chmod 400 /etc/ssl/private/radius.key
The remaining CSR can be submitted to your CA in return for a signed certificate, this will need to be exported along with the CA certificate of your CA to your RADIUS server at /etc/ssl/certs.
freeradius - Configure clients.conf
First, freeradius needs to be configured to look at your access point in order to see it as a valid RADIUS station:
sudo nano /etc/freeradius/clients.conf
Locate the existing line which states ipaddr = 127.0.0.1 and edit it reflect the IP Address of your access point E.G:
ipaddr = 172.16.0.5
Following this locate the line that states secret = Testing123 and enter the secret you added to your access point, E.G.:
secret = thisismysharedsecret
Save the file with CTRL+O
freeradius - Configure eap.conf
In v2 of freeradius, the configuration of EAP-TLS is configured within EAP > TLS, in later versions, the EAP file calls an external file, the configuration itself is identical however so watch out for that!
Assuming version 2:
sudo nano /etc/freeradius/eap.conf
Locate the eap config block and set the values at the root:
eap {
    default_eap_type = tls
    timer_expire = 60
    ignore_unknown_eap_types = no
    cisco_accounting_username_bug = no
    max_sessions = ${max_requests}
    ...
}
Within the eap block, locate the tls, verify and oscp blocks and set the below values:
eap {
...
    tls {
        certdir = ${confdir}/certs
        cadir = ${confdir}/certs
        private_key_file = /etc/ssl/private/radius.key
        certificate_file = /etc/ssl/certs/radius.crt
        CA_file = /etc/ssl/certs/ca-tinfoilcipher.crt
        dh_file = ${certdir}/dh
        random_file = /dev/urandom
        CA_path = ${cadir}
        cipher_list = "DEFAULT"
        ecdh_curve = "prime256v1"
        cache {
        enable = no
        lifetime = 24 # hours
        max_entries = 255
    }

    verify {
    }

    ocsp {
        enable = no
        override_cert_url = yes
        url = "http://127.0.0.1/ocsp/"
    }
...
}
Save the file with CTRL+O, exit with CTRL+X and restart the RADIUS service:
sudo /etc/init.d/freeradius restart
In order to connect to the SSID, export a Cert/Key bundle from your CA and install it to your device (this can be called a .PKCS#12, .p12 or .pfx file).
Debugging
Freeradius provides a live debug mode, in order to see connections hit the RADIUS server:
sudo /etc/init.d/freeradius stop
sudo freeradius -X
You will now see connections hit the RADIUS server and their path, in order to exit this mode and resume normal operation use CTRL+C and resume with:
sudo /etc/init.d/freeradius start