Hashicorp Vault - Reverse Proxy With NGINX
EDITED: 07/2024. Please take a look at THIS ARTICLE for a follow up discussing the risks and nuances relating to using HTTPS Reverse Proxies. An HTTP reverse proxy may not be the right tool for your circumstances and using one carries certain risks.
Recently I was presented with a very common problem, offer up a service which uses an unprivileged port, present that service through a reverse proxy of some kind and keep the entire system secure. In our case the service is Hashicorp Vault, frustratingly for such a popular application I couldn’t find any guides or implementation examples for how to do this with the popular reverse proxies or loadbalancer solutions, so here I’m going to look at how to do this with NGINX.
Before jumping in to this, there are legitimate downsides to using NGINX as a reverse proxy to Vault, but we live in the real world here and sometimes we have to work with constraints and secure appropriately. In a follow up article I’ll take a look at those issues in a bit more depth and what alternatives exist.

Intended Goal
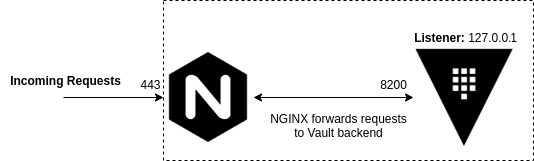
In our configuration, HTTPS requests will be sent to Vault on TCP port 443, then proxied to Vault on TCP port 8200 via the localhost, in this configuration Vault can ONLY be accessed via NGINX. Both NGINX and Vault will use TLS to secure their connection and NGINX will be configured with some hardening to prevent common security issues.
Our finished instance is going to look something like below:
I provisioned a Certificate and Private Key ahead of time for both Vault and NGINX and placed them on the target instance, I have also installed the CA Certificate used to sign these certificates on the target instance.
Implementation - Vault
For the sake of brevity, we’ll be using an almost identical setup and hardening of Vault as described in a previous article here, our Vault instance is going to be TLS encrypted and offer connections to the localhost only. In advance I have provisioned a Certificate and Private Key for the Vault service.
Our vault.hcl should look like:
storage "file" {
        path = "/opt/vault"
}

ui = true

listener "tcp" {
        address = "127.0.0.1:8200" #--Ensure that localhost is used rather than a hostname or host IP
        tls_disable = 0 #--TLS encrypt API
        tls_cert_file = "/etc/ssl/certs/mc-vault-frontend.crt"
        tls_key_file = "/etc/ssl/private/mc-vault-frontend.key"
}

max_lease_ttl = "10h"
default_lease_ttl = "10h"
api_addr = "https://127.0.0.1:8200" #--Ensure that localhost is used rather than a hostname or host IP
Implementation - NGINX
Now the real meat, NGINX is installed with a single package, for Ubuntu:
sudo apt-get install nginx
With the Certificate and Private Key located in /etc/ssl/certs and /etc/ssl/private respectively we can just use the NGINX default configuration file which is located in /etc/nginx/sites-enabled/default. If we edit the file using nano:
sudo nano /etc/nginx/sites-enabled/default
Delete the contents of the file and replace with the below functional configuration:
server {
        listen 443;
        server_name mc-vault.madcaplaughs.co.uk;

        #--Enable TLS encryption on the proxy
        ssl on;
        ssl_certificate /etc/ssl/certs/mc-vault-backend.crt;
        ssl_certificate_key /etc/ssl/private/mc-vault-backend.key;

        #--Tighten TLS configuration, disable caching, try and keep sensitive data out of the cache
        ssl_prefer_server_ciphers on;
        ssl_session_timeout 1h;
        ssl_session_cache off;
        ssl_session_tickets off;
        ssl_protocols TLSv1.2;

        location / {
                #--Fordward all requests to Vault running on the localhost
                proxy_pass https://127.0.0.1:8200;

                #--Ensures that NGINX will not attempt to connect to anything
                #--but a site signed signed by a certificate issued from our Certificate Authority
                proxy_ssl_verify on;
                proxy_ssl_trusted_certificate /etc/ssl/certs/mcl-root-ca.pem;

                #--Disable all caching, try and keep sensitive data out of the cache
                proxy_cache off;

                #--Session forwarding
                proxy_set_header Host $host;
                proxy_set_header X-Real-IP $remote_addr;
                proxy_set_header X-Forwarded-For $proxy_add_x_forwarded_for;
                proxy_set_header X-Forwarded-Proto https;
        }
}
The magic here is happening in the location block, which is seeing our requests be forwarded from the server_name (defined in the server block) to the host and port defined as proxy_pass with some additional headers which will also be included. I have also included several hardened configurations which you may or may not wish to use depending on your environment.
In this example my server is named mc-vault.madcaplaughs.co.uk, yours should be substituted with the FQDN of your own host (which will also need to be reflected in the CNAME/SAN on your Certificate), this isn’t an issue here as I’m reusing the same certificate that was previously applied directly to Vault.
Completing
With the configs in place, we’ll need to restart NGINX in order to load the configuration:
sudo /etc/init.d/nginx restart
# [ ok ] Restarting nginx (via systemctl): nginx.service.
Now if we attempt to connect to Vault via the GUI on TCP port 443 we should see a valid certificate presented:

As this is a new Vault instance we will need to init the backend, this is covered in my previous Setup and Installation post here so I’m not going to cover it again, as we can see the proxy is working correctly.
One important trade off to understand here is that Certificate Authentication with Vault will not work with this particular configuration as TLS termination is occurring at NGINX and a second TLS session is being established with Vault. This can however be done with some more advanced configuration of NGINX. If anyone is interested in any more advanced configuration let me know and I’ll write it up.