Terraform - Centralised State Locking with AWS DynamoDB
In a previous post we looked at setting up centralised Terraform state management using S3 for AWS provisioning (as well as using Azure Object Storage for the same solution in Azure before that). What our S3 solution lacked however is a means to achieve State Locking, I.E. any method to prevent two operators or systems from writing to a state at the same time and thus running the risk of corrupting it. In this post we’ll be looking at how to solve this problem by creating State Locks using AWS’ NoSQL platform; DynamoDB.

The Problem
As it stands our existing solution is pretty strong if we’re the only person who’s going to be configuring our infrastructures, but presents us with a major problem if multiple people (or in the cause of CI/CD multiple pipelines) need to start interacting with our configurations.
These scenarios present us with a situation where we could potentially see two entities attempting to write to a State File for at the same time and since we have no way right now to prevent that…well we need to solve it.
The Solution - State Locking
Luckily the problem has already been handled in the form of State Locking. If you’re running terraform without a Remote Backend you’ll have seen the lock being created on your own file system. When a lock is created, an md5 is recorded for the State File and for each lock action, a UID is generated which records the action being taken and matches it against the md5 hash of the State File.
This is fine on a local filesystem but when using a Remote Backend State Locking must be carefully configured (in fact only some backends don’t support State Locking at all)
DynamoDB - The AWS Option
When using an S3 backend, Hashicorp suggest the use of a DynamoDB table for use as a means to store State Lock records. The documentation explains the IAM permissions needed for DynamoDB but does assume a little prior knowledge. So let’s look at how we can create the system we need, using Terraform for consistency.
For brevity, I won’t include the provider.tf or variables.tf for this configuration, simply we need to cover the Resource configuration for a DynamoDB table with some specific configurations:
#--main.tf

resource "aws_dynamodb_table" "tinfoil_tf_state_locking" {
    name                    = "tinfoil_tf_state_locking"
    billing_mode            = "PROVISIONED"
    read_capacity           = 25 #--Max Free Tier
    write_capacity          = 25 #--Max Free Tier
    hash_key                = "LockID"
    attribute {
        name = "LockID"
        type = "S"
    }
    server_side_encryption {
        enabled = true
    }
}
A few points to cover here:
- Line 5: We’re setting the billing mode to Provisioned rather than On-Demand. For a tedious break down of costing see the AWS Documentation.
- Line 6-7: Capping Read/Write Capacity Units to 25 a piece should keep our table within AWS’ Free Tier. Unless you’re building enormous infrastructure you shouldn’t be seeing too much throughput and your table shouldn’t be growing anywhere near the size of the Free Tier limits.
- Line 8: Terraform will seek a Primary Key named LockID to write it’s State Lock IDs which we are creating here.
- Lines 9-12: Defining the LockID key as a String
- Lines 13-15: Enabling table encryption, because of course
Applying this configuration in Terraform we can now see the table created:

Implementing DyanmoDB for State Locking
Now that we have our table, we can configure our backend configurations for other infrastructure we have to leverage this table by adding the dynamodb_table value to the backend stanza.
If we take a look at the below example, we’ll configure our infrastructure to build some EC2 instances and configure the backend to use S3 with our Dynamo State Locking table:
#--BACKEND
terraform {
    backend "s3" {
        bucket          = "tinfoil-terraform-backend"
        key             = "ec2_build.tfstate"
        region          = "eu-west-2"
        dynamodb_table  = "tinfoil_tf_state_locking"
    }
}

#--PROVISIONING
data "aws_ami" "tinfoil" {
    most_recent = true
    filter {
        name   = "name"
        values = ["ubuntu//assets/2020-09-02-terraform-centralised-state-locking-with-dynamodb/hvm-ssd/ubuntu-xenial-16.04-amd64-server-*"]
    }
    filter {
        name   = "virtualization-type"
        values = ["hvm"]
    }
    owners = ["099720109477"] # Canonical
}

resource "aws_instance" "tinfoil" {
    ami                     = data.aws_ami.tinfoil.id
    instance_type           = "t2.micro"
    key_name                = "tinfoil-key"
    count                   =  2
    tags = {
        Resource = "Compute"
    }
}
If we now try and apply this configuration we should see a State Lock appear in the DynamoDB Table:
terraform apply

# Do you want to perform these actions?
#   Terraform will perform the actions described above.
#   Only 'yes' will be accepted to approve.

Enter a value: yes
# Acquiring state lock. This may take a few moments...
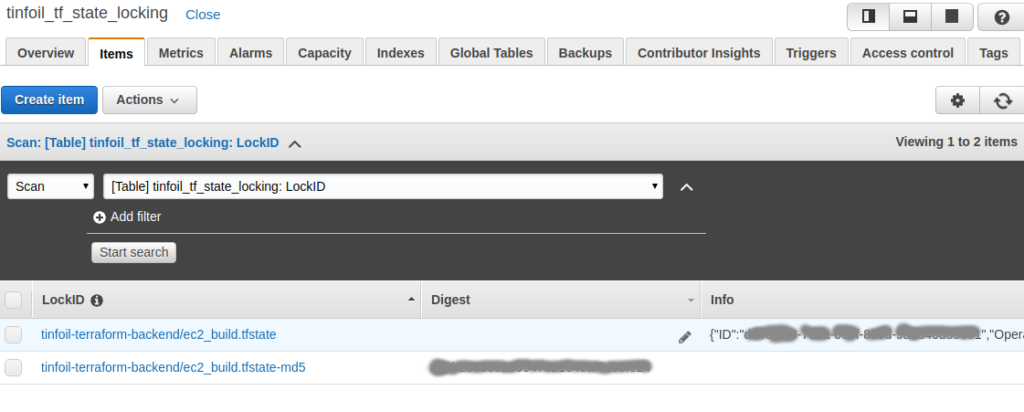
During the apply operation, if we look at the table, sure enough we see that the State Lock has been generated:

Finally if we look back at our apply operation, we can see in the console that the State Lock has been released and the operation has completed:
# Apply complete! Resources: 2 added, 0 changed, 0 destroyed.
# Releasing state lock. This may take a few moments...
…and we can see that the State Lock is now gone from the Table:

Simple as that!