Elastic Kubernetes Service - Securely Integrating AWS ALB with Istio IngressGateway
Recently I’ve had the experience of reconfiguring the popular Kubernetes Service Mesh Istio (using it’s Gateway ingress model) to work with an AWS Application Load Balancer with a degree of automation and scalability. This is a challenging deployment to say the least and whilst documentation exists to varying degrees for the separate components, it’s scant. I’m less than impressed with the official Istio documentation (though it has gotten way better) and am yet to find a really satisfactory guide to deploying this whole configuration anywhere online; the few that exist are either missing a couple of key components or leave some of the traffic unencrypted. In this somewhat lengthy post we’ll take a look at a secure end to end deployment and all the tricky obscure settings that go with it.

Pre-Requisites and Assumptions
In order to demonstrate this deployment, we’ve got the below components and configurations already stood up in AWS:
- An existing EKS Cluster, named tinfoilcluster, with a Managed Nodegroup attached. Running Kubernetes 1.19
- A Route53 Private Zone for the zone tinfoil.private any DNS zone will work but for clarity this is where our DNS lives.
- Istio-Operator has been deployed to our EKS Cluster via Helm. This will serve as our deployment method for Istio components.
- We will be deploying Application Load Balancers using the aws-load-balancer-controller, via Helm and using a properly configured IAM Role.
- An existing ACM Managed Certificate for *.cluster.tinfoil.private which we will attached to the ALB later.
So let’s take a look at what we want out of the process:
- We’ll be deploying a big favourite stack of mine, Netbox using this great Helm Chart, we’ll also be deploying the popular Object Storage platform MinIO. We won’t get bogged down in the application it’s just an example to put the infrastructure in front of it.
- We’ll be deploying Istio 1.8.5 (this guide has been tested as far back as Istio 1.6.5)
- All traffic from it’s initial entry to the Cluster should be encrypted until it reaches the Pod it is destined for.
- All front end traffic in to our cluster is going to use a single Ingress for cluster.tinfoil.private but traffic should also be able to gain ingress to the cluster at any prefix to this URL, E.G. foo.cluster.tinfoil.private.
Which should look like (if we simplify it a bit):
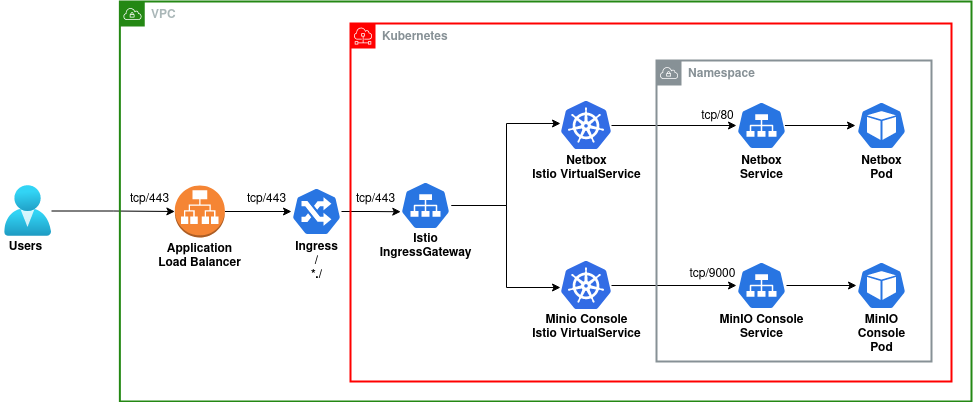
Should be easy right…
Taking A Look At The Istio-Operator Config
I’ll not go in to the installation of Istio-Operator, but there’s a couple of line’s in the Operator config for deploying the IngressGateway and the wider Service Mesh configuration used by the Istio Control Plane. The config below shows the important parts of our configuration:
apiVersion: install.istio.io/v1alpha1
kind: IstioOperator
metadata:
  namespace: istio-system
  name: istiocontrolplane
spec:
  profile: default
  meshConfig:
    defaultConfig:
      gatewayTopology:
        numTrustedProxies: 1 #--Define upstream proxy count
    gateways: #--Define ingress-gateway configuration
      istio-ingressgateway:
        type: NodePort #--LoadBalancer by default if not set
        serviceAnnotations:
          service.beta.kubernetes.io/aws-load-balancer-connection-draining-enabled: false #--True by default, uses ELB
          service.beta.kubernetes.io/aws-load-balancer-internal: false #--True by default, uses ELB
I’ve removed a few entries for brevity, but of note:
- numTrustedProxies must be set to a precise amount for the number of upstream proxies, in our example this is only going to be one (the Application Load Balancer), but if you were to add your own further proxies then this count needs to be raised. See the Istio Documentation here for further details.
- The istio-ingressgateway type is set to NodePort, this too is critical as the default type of LoadBalancer is incompatable with our deployment.
- The NodePort has had two ServiceAnnotations explicitly set to false, these default to true and cause us some more trouble as they are used for ELB Classic only.
Applying this configuration will instruct Istio-Operator to deploy both IstioD and Istio-Ingressgateway.
AWS Load Balancer Controller - Setup
The AWS Load Balancer Controller is an interesting project coming from Ticketmaster and CoreOS; it allows for scalable deployment of Application and Network Load Balancers over Kubernetes Clusters by watching for the deployment of new Ingresses or Services and then deploying new ALBs or NLBs respectively. This state is then maintained using a Custom Resource called TargetGroupBindings.
For proper secure deployment, we want to integrate our deployment with AWS IAM, this will ensure that our Controller’s Service Account uses an IAM Role to spawn Load Balancers as requested. Our Role has been created ahead of time as tinfoilcluster-aws-load-balancer-role, this configuration consists of an appropriate attached Policy and a Trust Relationship being established with a corresponding Service Account within the cluster via it’s OIDC endpoint.
Ours is already set up, but doing this is a complex and lengthy process that I’m not going to cover here. We can set this up quickly (if messily) by using the AWS CLI and eksctl:
#--Taken from https://docs.aws.amazon.com/eks/latest/userguide/aws-load-balancer-controller.html

#--Download policy document. Warning, it's lengthy
curl -o iam_policy.json https://raw.githubusercontent.com/kubernetes-sigs/aws-load-balancer-controller/v2.2.0/docs/install/iam_policy.json

#--Create IAM Policy from local Policy Document
aws iam create-policy \
    --policy-name AWSLoadBalancerControllerIAMPolicy \
    --policy-document file://iam_policy.json

#--Kubernetes Service Account, Create IAM Service Account, link to Policy and set up Trust Relationship
eksctl create iamserviceaccount \
  --cluster=tinfoilcipher \
  --namespace=istio-system \
  --name=aws-load-balancer-controller \
  --attach-policy-arn=arn:aws:iam::<your_account>:policy/AWSLoadBalancerControllerIAMPolicy \
  --override-existing-serviceaccounts \
  --approve
Be warned if you’re going to use this process, a randomly named IAM Role is going to be generated and attached to your Kubernetes Service Account. I don’t care for this so I’ve gone ahead and made my own Service Account in Kubernetes so I can attach the name of my own role:
kubectl get serviceaccount aws-load-balancer-controller -n istio-system -o yaml
# apiVersion: v1
# kind: ServiceAccount
# metadata:
#   annotations:
#     eks.amazonaws.com/role-arn: arn:aws:iam::REDACTED:role/tinfoilcluster-aws-load-balancer-role
#   creationTimestamp: "2021-06-11T21:09:18Z"
#   name: aws-load-balancer-controller
#   namespace: istio-system
#   resourceVersion: "6650"
#   uid: 4945b103-faa3-4e09-9cec-7a1b422b2a51
# secrets:
# - name: aws-load-balancer-controller-token-7tarE
AWS Load Balancer Controller - Deployment
With the groundwork laid, we can now deploy the AWS Load Balancer Controller using Helm, ensuring that it doesn’t create it’s own service account and uses ours:
#--Add AWS EKS Charts Helm Repo
helm repo add eks https://aws.github.io/eks-charts

#--Deploy AWS Load Balancer Controller to the istio-system Namespace, without creating a Service Account
helm install aws-load-balancer-controller eks/aws-load-balancer-controller -n istio-system \
  --set clusterName=tinfoilcluster --set serviceAccount.create=false \
  --set serviceAccount.name=aws-load-balancer-controller

# NAME: aws-load-balancer-controller
# NAMESPACE: istio-system
# STATUS: deployed
# REVISION: 1
# TEST SUITE: None
# NOTES:
# AWS Load Balancer controller installed!
With the Load Balancer Controller ready, can we can now deploy actually deploy a Load Balancer? Well technically yes, but really we should look at a change to our Istio Ingress-Gateway:
The Trouble With ALBs - Configuring The Istio-Ingressgateway
One of the challenges presented with Application Load Balancers that we don’t face when using “Classic” TCP Load Balancers is the inability to transparently forward encrypted traffic. If you want HTTPS on your ALB you’ll need to terminate HTTPS there and that means the traffic that comes out the other side is going to be in the clear.
Most of the configuration examples I tend to see for Istio tend to use HTTP to consume traffic on the inside of the Ingress-Gateway, this proves to be a non-issue when you’re using a Kubernetes LoadBalancer Service as traffic can be passed directly through the Load Balancer in to the Gateway, but now we have an extra hop to think about.
The AWS Load Balancer Controller takes this in to consideration and generates it’s own certificate which we can apply to our Istio Gateway HTTPs Servers. The below manifest will configure our Gateway (which we’ll call default-gateway) and apply it to our existing IngressGateway:
#--gateway.yaml
kind: Gateway
apiVersion: networking.istio.io/v1alpha3
metadata:
  name: default-gateway
  namespace: istio-system
spec:
  selector:
    istio: ingressgateway
  servers:
    - hosts:
        - '*' #--Hosts are being wildcarded, as we will only offer a single hostname
      port:
        name: https #--Create a port on the Gateway CALLED https
        number: 443 #--using TCP port 443
        protocol: HTTPS #--and the HTTPs protocol
      tls:
        mode: SIMPLE
        credentialName: aws-load-balancer-tls #--Secret contains the certificate generated for inside ALB traffic
We can apply this manifest using kubectl apply -f gateway.yaml. With the Gateway deployed, we can finally get the Load Balancer deployed.
Deploying The Application Load Balancer
As we discussed earlier, an ALB will spawn on the creation of an Ingress, this association will then be recorded as a TargetGroupBinding. To get this to work however, we need to specify some very specific Annotations (and seriously, this is not widely documented at all) a list of available annotations can be found here. The below manifest breaks down how our Ingress will be created:
#--ingress.yaml
apiVersion: extensions/v1beta1
kind: Ingress
metadata:
  name: istio-ingress
  namespace: istio-system
  annotations:
    kubernetes.io/ingress.class: alb
    alb.ingress.kubernetes.io/scheme: internal
    alb.ingress.kubernetes.io/subnets: subnet-12345678, subnet-09876543
    alb.ingress.kubernetes.io/listen-ports: '[{"HTTPS": 443}]'
    alb.ingress.kubernetes.io/certificate-arn: arn:aws:acm:eu-west-1:123456789012:certificate/b1f931cb-de10-43af-bfa6-a9a12e12b4c7 #--ARN of ACM Certificate
    alb.ingress.kubernetes.io/backend-protocol: HTTPS
spec:
  tls:
  - hosts:
       - "cluster.tinfoil.private"
       - "*.cluster.tinfoil.private"
    secretName: aws-load-balancer-tls
  rules:
  - host: "cluster.tinfoil.private"
    http:
      paths:
      - path: /*
        backend:
          serviceName: istio-ingressgateway
          servicePort: 443
  - host: "*.cluster.tinfoil.private"
    http:
      paths:
      - path: /*
        backend:
          serviceName: istio-ingressgateway
          servicePort: 443
A lot going on there, lets break it down:
- Lines 2-6: We’re creating a Kubernetes Ingress called istio-ingress in the istio-system namespace.
- Lines 7-13: Here we define a list of critical Annotations that make our Ingress actually work with aws-load-balancer-controller, these are really at the heart of the configuration, some of these can be inferred by proper AWS tagging, however I haven’t have great success using them so I like to apply them explicitly a manifest. From top to bottom we’re defining:
- The Load Balancer Type as alb.
- The Load Balancer scheme as internal (internet-facing is also an option if you wish to expose your service to the internet).
- Subnets over at least two Availability Zones (these should be the same AZs that your Nodegroup has been deployed to). Using Private subnets is suitable for an internal deployment and Public subnets should be used for an external deployment. These will be used to associate with your Load Balancer.
- A list of Listen Ports that the Load Balancer will listen on. We will listen on only HTTPS: 443.
- The ARN of the ACM Certificate we created earlier to bind to our Load Balancer and terminate our incoming TLS connection.
- The inside
- The inside protocol of the Load Balancer as HTTPS.
- Lines 15-19: Here we define which hostnames we will allow ingress for, enforcing TLS and specifying the inside certificate as aws-load-balancer-tls
- Lines 21-27: Here we define the routing options for cluster.tinfoil.private, send all traffic to the istio-ingressgateway on ServicePort 443.
- Lines 28-34: The same for *.cluster.tinfoil.private, this allows us to send traffic for prefix URLs to the istio-ingresgateway.
We can apply out manifest with kubectl apply -f ingress.yaml and after a while we should be able to see our ingress with the DNS name of a Load Balancer listed as it’s address, if we dig deeper we can find that TargetGroupBinding that’s made the connection:
#--Display ingress, associated with the Load Balancer DNS Name
kubectl get ingress istio-ingress -n istio-system
# NAME            CLASS    HOSTS                                              ADDRESS                                                                        PORTS  AGE
# istio-ingress   <none>   cluster.tinfoil.private,*.cluster.tinfoil.private  internal-k8s-istiosys-istioing-e5f220172-92142121.eu-west-1.elb.amazonaws.com  443    21m

#--Display TargetGroupBinding, associated with Load Balancer ID
kubectl get targetgroupbinding -n istio-system
# NAME                              SERVICE-NAME           SERVICE-PORT   TARGET-TYPE   AGE
# k8s-istiosys-istioing-ac7d92dfee  istio-ingressgateway   443            instance      20m9s
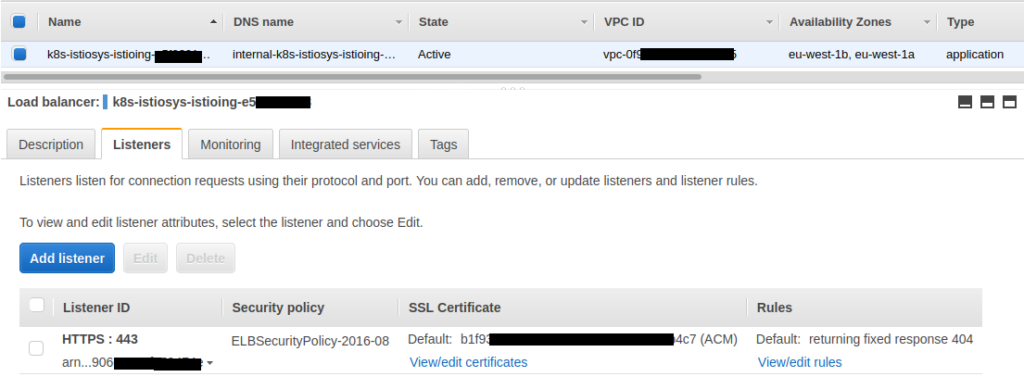
If we look at the AWS Console, we can see that our ALB has indeed deployed with it’s certificate attached and the correct listener configuration:
Deploying An Application To The Service Mesh
Our Load Balancer is now deployed and communicating with the IngressGateway securely but we need to now get our application running inside the Service Mesh and get traffic to it.
First, we’ll create a namespace for our application. We’ll call the namespace netbox:
#--Create netbox Namespace
kubectl create namespace netbox
# namespace/netbox created

#--Enable Istio Sidecar injection in netbox Namespace
kubectl label namespaces netbox istio-injection=enabled
…and then configure PeerAuthentication within that Namespace to enforce Strict Mutual TLS using the Istio Proxy Sidecar. Below is our manifest:
#--netbox_peerauth.yaml

apiVersion: "security.istio.io/v1beta1"
kind: "PeerAuthentication"
metadata:
  name: "default"
  namespace: netbox
spec:
  mtls:
    mode: STRICT
We can apply this using kubectl apply -f netbox_peerauth.yaml.
Now we can deploy Netbox using Helm:
#--Add bootc and Helm Repo
helm repo add bootc https://charts.boo.tc

#--Deploy Netbox
helm install netbox \
  --set postgresql.postgresqlPostgresPassword=MySecretPassword1 \
  --set postgresql.postgresqlPassword=MySecretPassword2 \
  bootc/netbox -n netbox

# NAMESPACE: netbox
# STATUS: deployed
# REVISION: 1
# NOTES:
# Get the application URL by running these commands:
After deployment we can see that our Pods are all up and running, and if we dig a little deeper in to to the spec of one of the running Pods; we can see that the Istio-Proxy container is running as a Sidecar:
kubectl get pods -n netbox
# NAME                             READY   STATUS    RESTARTS
# netbox-68f44b699b-bl89q          2/2     Running   0
# netbox-postgresql-0              2/2     Running   0
# netbox-redis-master-0            2/2     Running   0
# netbox-redis-slave-0             2/2     Running   0
# netbox-redis-slave-1             2/2     Running   0
# netbox-worker-86d6854f9b-qmhwp   2/2     Running   0

kubectl get pods netbox-68f44b699b-bl89q -n netbox -o jsonpath='{.spec.containers[*].name}'
# netbox istio-proxy
Accessing the Application as a Virtual Service
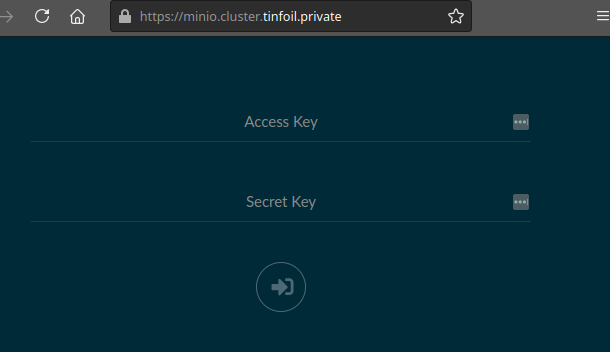
At present we’re catching all traffic through the IngressGateway, we can route traffic differently depending on hostnames, most easily by using prefixes, by using Virtual Services. We’re going to want to present both the Netbox and MinIO web consoles as Virtual Services and present them at https://netbox.cluster.tinfoil.private and https://minio.cluster.tinfoil.private.
First we’ll need to know what _Service Port_s our applications are listening on:
#--Find Netbox Service Ports
kubectl get service netbox -n netbox
# NAME     TYPE        CLUSTER-IP      EXTERNAL-IP  PORT(S)
# netbox   ClusterIP   172.20.11.203   <none>       80/TCP

#--Find MinIO Console Service Ports
kubectl get service console -n netbox
# NAME    TYPE        CLUSTER-IP      EXTERNAL-IP   PORT(S)
# minio   ClusterIP   172.20.74.163   <none>        9000/TCP
Now we have our Service Ports, we can configure our Virtual Services. The below manifests show how we can create Virtual Services for our two web consoles:
#--virtual_services.yaml

apiVersion: networking.istio.io/v1alpha3
kind: VirtualService
metadata:
  name: netbox #--Netbox Console Virtual Service Name
  namespace: netbox #--Service Namespace
spec:
  hosts:
  - "netbox.cluster.tinfoil.internal" #--Virtual Service Hostname
  gateways:
  - default-gateway.istio-system.svc.cluster.local #--Refer to the default gateway by it's FQDN
  http:
  - match:
    - uri:
        prefix: /
    route:
    - destination:
        host: netbox #--Netbox Console Service Name
        port:
          number: 80 #--Netbox Console Service Port
---
apiVersion: networking.istio.io/v1alpha3
kind: VirtualService
metadata:
  name: minio #--MinIO Console Virtual Service Name
  namespace: netbox #--Service Namespace
spec:
  hosts:
  - "minio.cluster.tinfoil.internal" #--Virtual Service Hostname
  gateways:
  - default-gateway.istio-system.svc.cluster.local #--Refer to the default gateway by it's FQDN
  http:
  - match:
    - uri:
        prefix: /
    route:
    - destination:
        host: minio #--MinIO Console Service Name
        port:
          number: 9000 #--MinIO Console Service Port
We can apply this with kubectl apply -f virtual_services.yaml to create both Virtual Services.
I’ve used some Terraform to set up a DNS A Records in Route 53 for cluster.tinfoil.private and *.cluster.tinfoil.private to point to the DNS Name of our ALB (that process is broken down here if you’re interested). So we should now be able to access our services:

Conclusion
This was a pretty challenging deployment, not aided by the big lack of detailed documentation on the topic and only a few incomplete guides floating around. After working with it for a few days the mystery eventually started to fall away but this one was tough to get moving. The integration with IAM as provided by eksctl is a lot messier than anything I like to use, it’s powered by CloudFormation and ends up leaving randomly named artifacts lying all over with no state to prevent drift. I find these components a lot easier to manage via Terraform but it’s a lot more complicated to write in the first instance (if anyone really wants to see how to do that that let me know).
I saw a lot of confused posts around online while I was working my way through this problem, especially with regards to understanding how certificates work and why you can’t forward encrypted traffic using an ALB the same as with an ELB, so I suspect there’s a lot more people out there struggling with this deployment. Like everything else, it can be cracked with enough time reading the logs and enough patience to read all the resources out there.
If you’ve found this useful, take a look at this later post where we’re looking at configuring Health Checks for this deployment.