Securely Integrating Github Actions with AWS using OIDC
If you’re trying your hand at implementing a CI pipeline with Github Actions and AWS you would be forgiven for finding yourself going in circles with some pretty confusing documentation when it comes to trying to get authentication working. Most of the examples and a lot of the blog posts out there tell you to just create an account, export the Access Key ID and Secret Access Key to environment variables and then reference them in your pipeline, job done. In a lot of ways you can understand this, trying to explain anything more advanced to an absolute newcomer is pretty daunting.
In this post we’ll look at a much more secure method for CI authentication using OIDC (Open ID Connect), that can do away with the pain of having to worry about secret management and the endless tedium of credential cycling that comes along with it.

What’s So Wrong With Just Using An Access Key ID and Secret Access Key?
What is left unsaid in examples that use an Access Key ID and Secret Access Key is just how insecure an implementations like this really are. It’s pretty common in the wild to find examples where an Access Key ID and Secret Access Key have been generated and then haven’t been rotated in years and are sitting around like a landmine waiting to be discovered, like a root password written on a post-it note.
Even if there IS a plan to rotate them, they are still pretty vulnerable. If a would be attacker gains access to your repository and is able to view or export them they may very well be able to use these same credentials to authenticate with your AWS account from anywhere (depending on what other security mechanisms you have in place) and an intrusion like this can easily go unnoticed. It’s my experience that people tend to really know that there is something inherently wrong about about a setup like this but end up kludging it together anyway because it was in the official docs and OIDC sounds a bit too confusing.
OIDC To The Rescue
A decent OIDC implementation can help us out here. It works by performing Authorization based on the source the Authentication request (in this case, where our Action is running).
In our example, we will be throwing away user account and Access Key and replacing it with a couple of key components:
- An OIDC Provider, which will mediate our authentication requests. AWS do a lot of the heavy lifting for us here, we just need to do some basic configuration.
- An IAM role, which our Github Actions steps will use to send Authentication requests to the OIDC Provider
- A Trust Relationship between the two, which allows access only from a specific Github Organisation or Repositories with a strict TTL (Time To Live)
The below diagram shows our workflow at the high level:
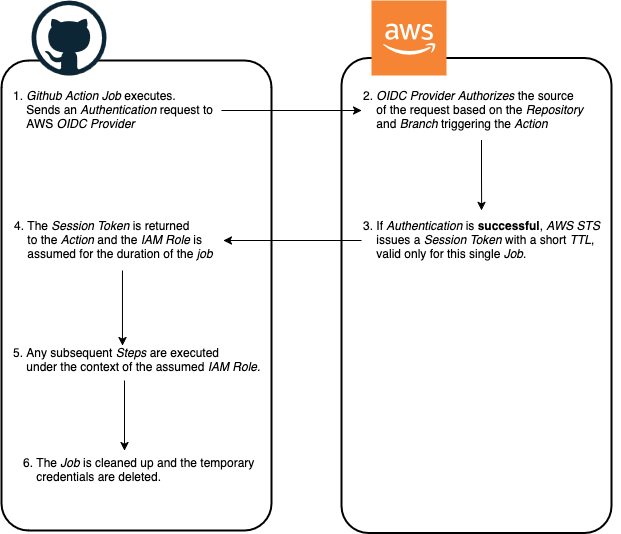
As we can see, this arrangement removes the need for messing around with static credentials and instead gives us a tightly controlled system where short lived credentials are generated on demand and then revoked at the end of a session.
I’m not going to get bogged down in the details of how OIDC itself works, you can find that in a million places and this article will go on forever if we talk about it here too, if you are interested you can get a good breakdown here.
So, that’s a nice idea on paper, how do we actually set it up?
Creating an AWS OIDC Provider
In the AWS console browse to IAM > Identity Providers > Add Provider. Configure:
- Provider URL: https:token.actions.githubusercontents.com - This will ensure that OIDC Authentication requests are accepted ONLY from Github Actions Jobs and not from rogue sources
- Audience: This will ensure that STS tokens are issued only to an IAM Role via the AWS Security Token Service (I.E. a role configured via an appropriate Trust Relationship, which we will configure shortly).
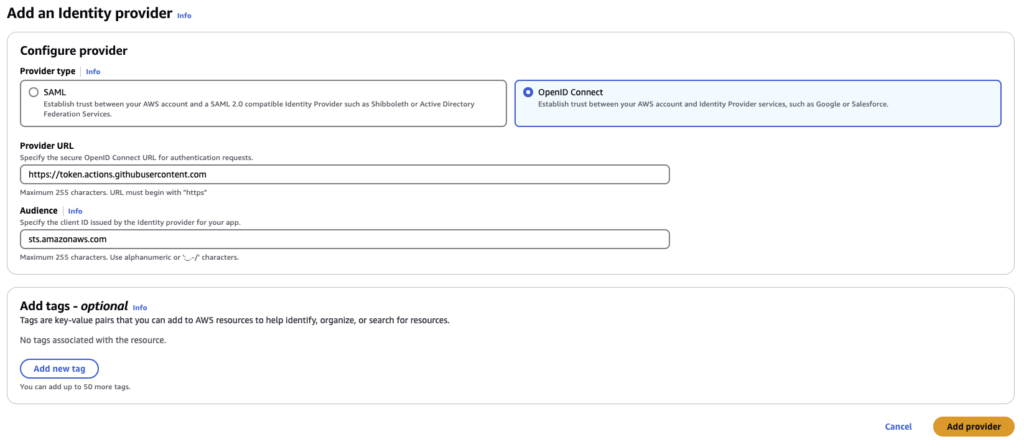
Click Add Provider.
Our OIDC Provider is now configured and ready for use.
Creating An IAM Role and Trust Relationship
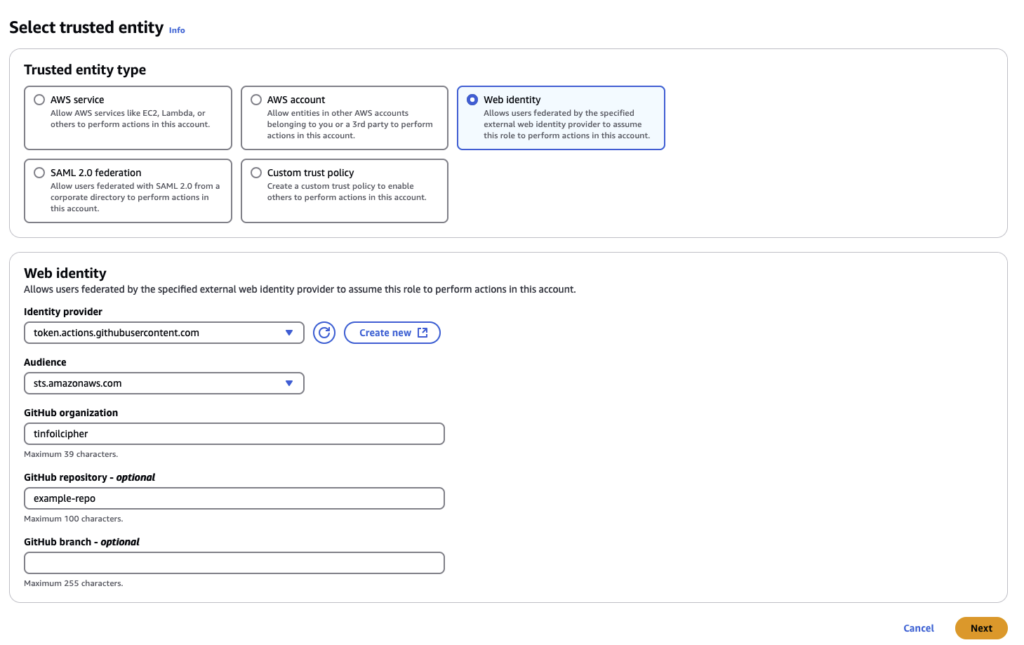
Next, browse to IAM > Roles > Add Role. Configure:
-
Identity Provider: This is the provider we just created which can be selected from a dropdown and will inform the rest of the fields we can choose.
-
Audience: The audience(s) associated with our provider
-
Github organization: Your Github Organisation, this will ensure that OIDC Authentication requests will only be accepted from this Organisation
-
Github repository: This is optional, but can be used to further filter down the source of OIDC Authentication requests. If specified then requests will only be accepted from a specific Github Repository
-
Github branch: Also optional, if specified OIDC Authentication requests will only be accepted from a specific branch on a specific repository
Click Next and attach a suitable set of Policies to your Role:

Click Next again and give the Role a name and description. In this final page we can see how the Trust Relationship has been templated in JSON. We can manually edit the JSON document after creation via the Role’s Trust Relationship tab if a more advanced set of filters is needed.
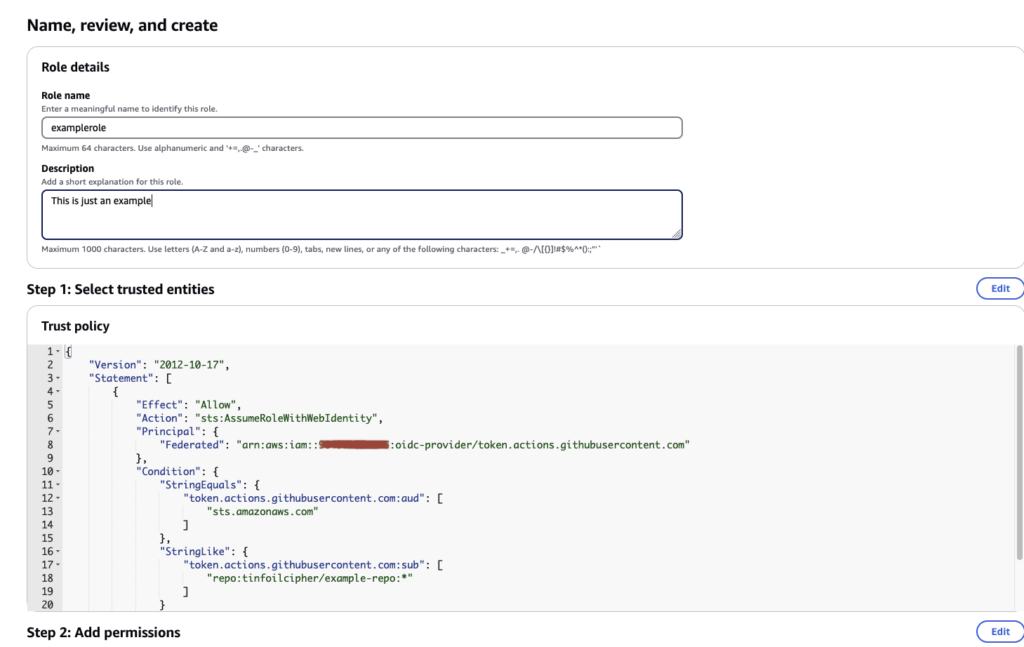
Finally, click Create to create the new Role.
Our new role is now ready for consumption via Github Actions. By default it has a TTL of 1 Hour (meaning that any sessions we initiate via Github Actions have a 1 hour limit). Really this should be more than enough time, but it can be raised or lowered as needed under Maximum Session Duration:

Configuring IAM Credentials in Github Actions
Inside any Github Actions manifest we can now use the official configure-aws-credentials action to perform our OIDC authentication as a Step:
#--.github/workflows/example.yml

on:
  push: #--Execute on commit
  workflow_dispatch: #--Execute on manual request from web console

permissions:
      id-token: write #--This permission is neeeded to request a token from the OIDC provider

jobs:
  example_job:
    name: Example Job
    runs-on: ubuntu-latest
    steps:

      - name: 'Configure Credentials'
        uses: aws-actions/configure-aws-credentials@v4.0.2
        with:
          role-to-assume: "your-role-arn" #--ARN of your role
          role-session-name: "gha_session_${{ github.run_id }}" #--Assign a unique ID to each session ID
          aws-region: "eu-west-2" #--Configure as appropriate

      - name: 'List All S3 Buckets'
        run: aws s3 ls
A quick note on the configuration of role-session-name above. When working in a complicated system or performing a lot of CI operations, it can get pretty painful trying to work out exactly which job was responsible for which change to your infrastructure. To that end it is a good idea to give each session a unique ID so it can be correlated back to the exact run that made a change. A lot of examples seem to suggest just setting this to “Github Actions” or something similar, but that can cause you some serious trouble when something gets deleted or broken and you need to try and pin down exactly how it happened!
If we try and execute this example, we can see that our Role gets assumed fine and we can run Jobs against AWS:
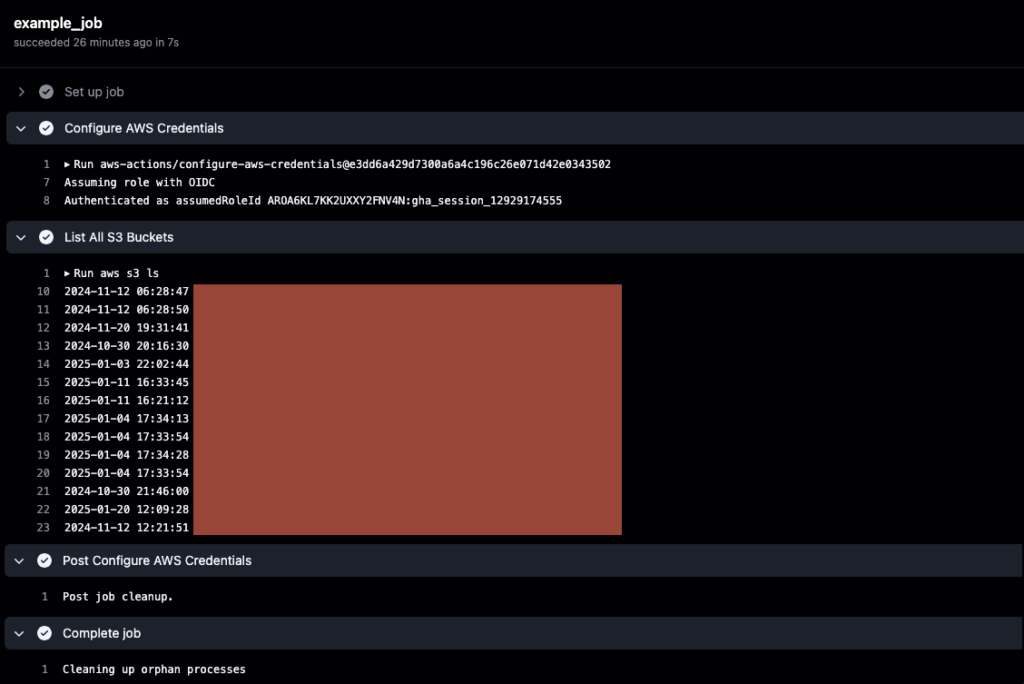
As we can see in the image above, this all works just fine and cleans up the session cleans up after itself. With this nice arrangement we can get rid of the pain of pasting static secrets and limit ourselves to just thinking about the Role ARN. Simple!