Crossplane v2 – Infrastructure as Code for Kubernetes Platform Teams Part 1
Crossplane is an interesting piece of software and a relative newcomer to the Infrastructure as Code space. It’s creators don’t like to bill it as an Infrastructure as Code solution, but the more you look…it’s primary offering does appear to be the provisioning and management of infrastructure resources…via code, so I’ll let you be the judge. There are some core differences that separate Crossplane from it’s competitors that are worth getting in to but the majority of conversations appear to be around using Crossplane to template, provision and manage cloud resources. With that in mind, I want to take a look at this first and then move on to the more advanced features.
It’s been a minute since we last looked at Crossplane, back when we last took a look the application was already fairly mature in v1.9, but recently v2.0 has released and a lot has changed. Some of the core ideas have been thrown out completely in favour of a whole new set of systems and concepts that need to be learned. Because of this change, a lot of the information out there is stale, so let’s start from scratch and try and figure it out again.
The sample code for this article can be found here.

What Is Crossplane Anyway? Control Planes Everywhere!
If you go to the Crossplane Website, you would be forgiven for not exactly understanding what this product does. Let’s take a glance at the pitch:
Crossplane Is the Cloud-Native Framework for Platform Engineering. Create platforms like cloud providers. Build your own APIs and services with control planes. Extend Kubernetes to manage any resource anywhere. Use a library of components to assemble your platform faster
Sounds fancy, but it’s a bit impenetrable, what’s on offer here?
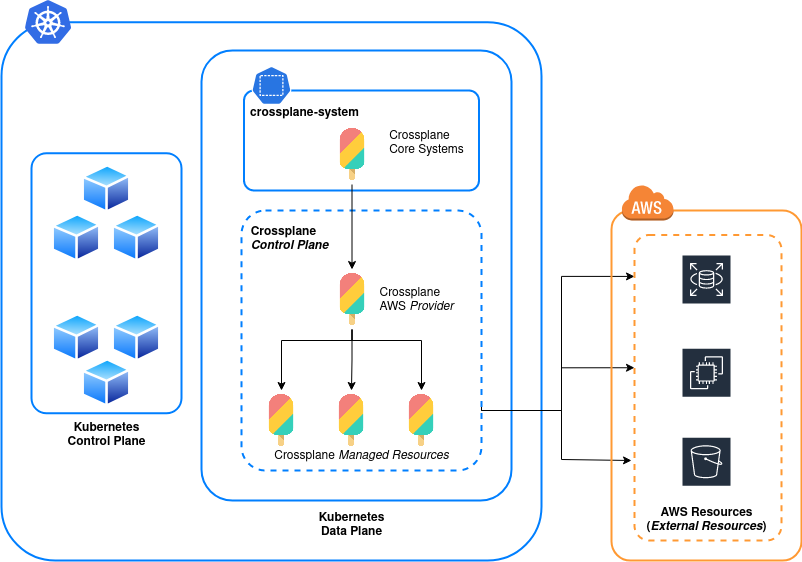
The term Control Plane has it’s roots in physical network routing and switching, but around a decade ago the term was hijacked by developers creating the first wave of cloud-native systems. These days, in cloud systems, a Control Plane has come to mean a piece of software, usually some kind of platform exposed via an API, that controls and manages other platform systems on the back end. Uou as the consumer send your requests to the Control Plane’s API, and it undertakes action on your behalf. To quote the Crossplane docs:
A control plane can configure any cloud native software. It could deploy an app, create a load balancer, or create a GitHub repository.
That is a very big claim and it’s still pretty vague, so let’s try and make sense of it…
Crossplane creates additional Control Plane(s) inside Kubernetes which act as the orchestration layer for resources in your cloud systems. It offers this functionality by allowing you to create your own custom resources, templating and workflows which are offered to consumers as Kubernetes CRDs. This allows consumers to create and manage cloud resources via the same YAML manifests used elsewhere in Kubernetes and removes the burden for development teams to learn domain specific languages (as are needed for Terraform, CloudFormation, ARM Templates etc.)
A final thing to be aware of; Kubernetes already operates it’s own Control Plane (known as the Master Nodes in old lingo). Don’t get this mixed up if you’re trying to do your own reading. Crossplane, along with anything it manages will be executed on the Kubernetes Data Plane the same as any other workload.
That’s a lot to process so let’s try and draw it out with a pretty picture:
OK, that was a mouthful, how do we actually get something installed?
Installing Crossplane
Installation is best achieved using Helm. It is suggested you install to the crossplane-system namespace.
helm repo add crossplane-stable https://charts.crossplane.io/stable
helm repo update
helm install crossplane -n crossplane-system crossplane-stable/crossplane --create-namespace
#
# NAME: crossplane
# LAST DEPLOYED: Wed Oct 8 18:05:05 2025
# NAMESPACE: crossplane-system
# STATUS: deployed
# REVISION: 1
# ...
Once installed, run
kubectl get pods -n crossplane-system -w
…and wait for all pods to be Ready:
# NAME                                         READY   STATUS    RESTARTS   AGE
# crossplane-691bd74f88-9wabx                  1/1     Running   0          2m
# crossplane-rbac-manager-7bbf7153f4-8fjab     1/1     Running   0          2m
Integrating With a Cloud Provider, Securely
In order to for Crossplane to start provisioning resources it is going to need some means of communicating with our public cloud provider’s API. In this example we’ll be speaking to AWS.
All of the documentation examples for Crossplane show how to do this using static credentials, but this always creates a security nightmare and should be avoided. Ideally this should be done using an IRSA role over OIDC. Setting up such a role is a little bit out of the scope of this article, but I have covered it before here and the process is well covered in the AWS documentation here .
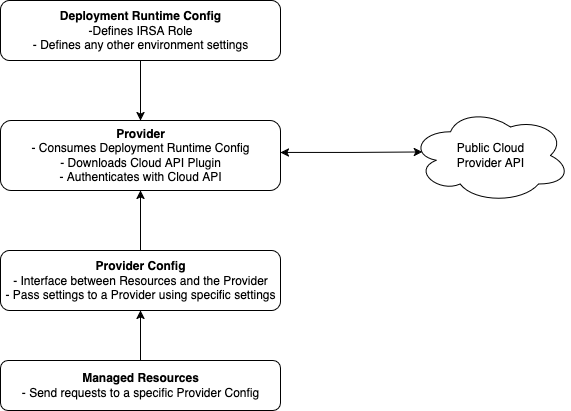
There are 3 main concepts to understand in how we should properly integrate with a public cloud using Crossplane:
- Deployment Runtime Configs - This object defines your IRSA role (as well as any other environment config).
- Providers - The provider downloads a Crossplane plugin to communicate with a specific cloud provider API (in a package called an xpkg) . It uses the credentials from a Deployment Runtime Config to authenticate with the API.
- Provider Configs - Provider configs are the interface that Managed Resources use to send requests to the Provider. They can either be Namespaced or Cluster Wide. Different Provider Configs can be used to pass different sets of settings to the same Provider and can be used to serve the same Provider to several Namespaces.
The below diagram shows how this works in a little more detail
The manifests we need to deploy are below, I have included some comments to break them down in more detail:
# 01-provider.yaml

apiVersion: pkg.crossplane.io/v1beta1
kind: DeploymentRuntimeConfig
metadata:
  name: aws
spec:
  serviceAccountTemplate:
    metadata:
      annotations:
        eks.amazonaws.com/role-arn: arn:aws:iam::123456789012:role/crossplane-example-role #--Your IRSA role here
---
apiVersion: pkg.crossplane.io/v1
kind: Provider
metadata:
  name: provider-aws-s3
spec:
  package: xpkg.upbound.io/upbound/provider-aws-s3:v2.1.0
  runtimeConfigRef:
    name: aws #--Links to the Runtime Config above
Apply these configs with:
kubectl apply -f 01-provider.yaml
The provider will take a few seconds to come online as it needs to download the API plugin package. You can check the status of the installation with:
kubectl get provider
# NAME                 INSTALLED   HEALTHY   PACKAGE                                           AGE
# provider-aws-s3      True        True      xpkg.upbound.io/upbound/provider-aws-s3:v2.1.0    15m
Packages, Specs and Where To Find Them
As we have mentioned above, Providers need to be pointed at a specific Package in order to download an API plugin. As you look around the internet you will see a lot of conflicting information about where to download your plugins and how to find the input specs for the CRDs they provide. This information isn’t exactly obvious and appears to have changed gradually over time. This is the most up to date information I’ve been able to find:
| URL/URI | Purpose |
|---|---|
| https://github.com/orgs/crossplane-contrib/packages | Lists releases for official Crossplane packages, also contains docs |
| https://marketplace.upbound.io/ | Provides input spec for Packages and the CRDs that they provide |
| ghcr.io/crossplane-contrib/$PACKAGE_NAME:$TAG | Image URI for packages hosted in releases above |
| xpkg.crossplane.io/crossplane-contrib/$PACKAGE_NAME/$TAG | Image URI for packages AS RECOMMENDED IN THE DOCS |
| xpkg.upbound.io/crossplane-contrib/$PACKAGE_NAME/$TAG | Image URI for packages PRIOR TO CROSSPLANE v1.2 |
Quite a confusing set of addresses there and a lack of consistency in how to apply them. Personally, I have found the best way to work is to use xpkg.crossplane.io to pull packages as recommended in the docs. A comprehensive list of Providers and Functions can be browsed along with their schemas at https://marketplace.upbound.io, which is very similar to the Terraform Registry.
An interesting quirk of all of this (that doesn’t appear to be documented), is that any attempt to mix and match these sources will install your providers, but it will break the built in RBAC manager for Provider Service Accounts in very unusual ways. This is detailed in this issue in detail.
With this understood, the Provider is now ready to be consumed.
Where Exactly Are Providers?
As another point of clarity, Providers are ALWAYS deployed to the same Namespace as the Crossplane installation, which by default is crossplane-system. You can create as many Providers as you want, but there is no way to host them in a separate Namespace.
When a Provider is deployed and it pulls a Package, a Pod is started that handles the execution of any tasks nt that Provider (I.E. the creation and management of any Managed Resources). If we look up our Providers, note that we don’t need to specify a Namespace:
kubectl get provider
# NAME                   INSTALLED   HEALTHY   PACKAGE                                            AGE
# ...
# provider-aws-s3        True        True      xpkg.upbound.io/upbound/provider-aws-s3:v2.1.0     20m
If we search Pods in the crossplane-system Namespace, we can see a corresponding Pod which is responsible for execution:
kubectl get po -n crossplane-system
# NAME                                              READY   STATUS    RESTARTS   AGE
# crossplane-69ff884f88-9whvg                       1/1     Running   0          15m
# provider-aws-s3-b8661e4aa4e9-12c59dedd1-625dg     1/1     Running   0          21m
# ...
In this example, looking at the logs of provider-aws-s3-b8661e4aa4e9-12c59dedd1-625d will show the API calls being made to aws-s3.
Provider Types and Configs
As mentioned already, ProviderConfigs can be Cluster Wide or Namespaced. This means that you have two options:
- Creating ClusterProviderConfig, which can be consumed by all tenants on a cluster, from any namespace.
- Creating multiple ProviderConfigs that can be consumed from only within a single namespace.
Both options work well in multi-tenant environments and both can be used to handle Managed Resource provisioning in scenarios where multiple tenants are operating on a single Kubernetes cluster and only have permissions to create Managed Resources in their own Namespace.
In this example we will be going with the creation of a ClusterProviderConfig though if you want to see how to configure multiple Namespaced ProviderConfigs I have included some examples in GitHub here.
First, lets create some tenant Namespaces using the manifest below:
#--02-namespaces.yaml

apiVersion: v1
kind: Namespace
metadata:
  name: tenant1
---
apiVersion: v1
kind: Namespace
metadata:
  name: tenant2
Apply with:
kubectl apply -f 02-namespaces.yaml
The below manifests will create a single ClusterProviderConfig:
#--03-providerconfig.yaml

apiVersion: aws.m.upbound.io/v1beta1 #--Namespaced endpoint. Allows namespaced MR creation.
kind: ClusterProviderConfig
metadata:
  name: aws
spec:
  credentials:
    source: IRSA #--Look up credentials from the environment, using IRSA. As our Provider already has this loaded in it's env, authentication is transparent
  #--This configuration allows us to link multiple AWS services to a single ClusterProviderConfig
  endpoint:
    url:
      type: Dynamic
      dynamic:
        host: amazonaws.com
        protocol: https
    services: [s3] #--Expand this list as needed for other AWS services, sqs, iam, ec2 etc.
Apply with:
kubectl apply -f 03-providerconfig.yaml
Once deployed, the Provider watches for Resource requests coming via a ProviderConfig that it supports.
Deploying Managed Resources
With everything in place, we can now start creating Managed Resources in our Namespaces. Whilst the input spec of each Managed Resource is different, they all share a set of common fields in their schemas:
| Field | Purpose | Optional |
|---|---|---|
| forProvider | Used to pass input parameters to the Managed Resource | No |
| initProvider | used to override Provider default configuration values | Yes |
| providerConfigRef | Defines the ProviderConfig if one is being used. | No |
| managementPolicies | Manages Crossplane Management Policies. | Yes |
| writeConnectionSecretToRef | Secret name to output secrets for a Managed Resource that generates secret return data. | Yes |
These are all detailed in the Crossplane Managed Resource docs.
The below manifest will create a couple of S3 Bucket Managed Resources:
#--04-resources.yaml

apiVersion: s3.aws.m.upbound.io/v1beta1 #--Namespaced CRD. Although cluster-wide ProviderConfig, our resources are namespaced
kind: Bucket
metadata:
  name: tinfoil-example-bucket-08-10-25-tenant-1 #--S3 Bucket name
  namespace: tenant1 #--Provisioning Namespace
spec:
  forProvider:
    forceDestroy: true #--S3 configuration parameter
    region: eu-west-2 #--AWS Region
  providerConfigRef:
    kind: ClusterProviderConfig
    name: aws #--ProviderConfig as defined earlier, calling the S3 service
---
apiVersion: s3.aws.m.upbound.io/v1beta1
kind: Bucket
metadata:
  name: tinfoil-example-bucket-08-10-25-tenant-2
  namespace: tenant2
spec:
  forProvider:
    forceDestroy: true
    region: eu-west-2
  providerConfigRef:
    kind: ClusterProviderConfig
    name: aws
Apply with:
kubectl apply -f 05-resources.yaml
After a few seconds, your Managed Resources should exist in AWS:
kubectl get buckets.s3.aws.m.upbound.io --all-namespaces
# NAMESPACE   NAME                                       SYNCED   READY   EXTERNAL-NAME                              AGE
# tenant1     tinfoil-example-bucket-08-10-25-tenant-1   True     True    tinfoil-example-bucket-08-10-25-tenant-1   41s
# tenant2     tinfoil-example-bucket-08-10-25-tenant-2   True     True    tinfoil-example-bucket-08-10-25-tenant-2   43s
- Synced: True: Means that Crossplane has sucessfully reconciled it’s desired state for your Managed Resource with AWS.
- Ready: True: Means that your Managed Resource is provisioned/modified in AWS and is ready for use.
If we check the AWS console, we can see that the S3 are indeed present:

Advanced Functionality
Believe it or not. This is all just the basics and doesn’t even begin to scratch the surface. This might look like a lot of work just to create an S3 bucket, but remember that Crossplane is intended to work on a huge scale, automating and managing the creation and lifecycle of resources for large scale platforms, not just single resources. The foundation therefore needs to be sturdy and scalable before you create a single resource.
As we move deeper in to Crossplane things get even more complex and more advanced just managing resources. In the next post we’ll be taking a look at how to really unlock the customisation potential of Crossplane by building custom CRDs to serve pre-templated service offerings and at some other automation functionality hiding inside.