Outside of the tools, technology and other bells and whistles of the DevOps mindset are the concepts of CI/CD (Continuous Integration and Continuous Delivery). Getting to grips with this mentality and the tools used to implement it can be a challenge but not one that needs to take a lifetime, especially not if you’ve been observing some sensible behaviour out of the gate. A multitude of tools claim to have the perfect solution to the problem, Jenkins, CircleCI, Octopus, CodeBuild, Bamboo, but for my money (and the type of work I tend to do) the solution is Azure DevOps’ Pipelines.
How I learned to stop worrying and love the pipeline

As a lifelong advocate of automation solutions, CI/CD solutions should have been an obvious thing to move straight in to, but on first discovery they can seem a little daunting and present no easy handle to get a hold of, this really isn’t the case and the seemingly gigantic complexities melt away within a few hours once you realise just how versatile they are, in a nutshell a good pipeline should allow you to:
- PACKAGE up a solution, be that an Application, Infrastructure as Code or any number of other systems, from a source control repo based on triggered changes to that repo
- TEST that solution, using automated, manual or a mix of other testing strategies. The emphasis obviously should always be on automation
- DEPLOY that solution to an environment, be that a development, staging or production environment
Once the initial learning curve is over, it’s hard not to want to embrace that approach for everything, the key takeaway is that a continuous approach of integration/deployment massively closes the gap of both bug detection and fixes, in turn reducing the time between new releases.
Azure Logic Apps – A Working Example
I’m going to be working with a simple example, a very simple 2 step Azure Logic App which has a REST API listener to accept a POST containing a name and uid, this data will then be passed to a storage account and create a blob named for the uri containing the name data, the flow will look like this:

Azure RM and DevOps – Some Prerequisites
In order to get this up and running, we’re going to have a couple of things set up in Azure Resource Manager and Azure DevOps ahead of time.
In Azure Resource Manager, we’re going to have a single Resource Group named tinfoil_logic_rg which contains:
- A single Storage Account named tinfoilappstorage which contains a single container named incoming
- A single Key Vault named tinfoillogicapp-keyvault which contains a single secret named tinfoil-logicapp-storage-key which will contain the primary access key to the Storage Account as an encrypted secret

Going in, these are the only resources we have ahead of time, and we do not have any Logic Apps in existence:

In Azure DevOps, lets also create a Service Connection, this is going to act as our means of authenticating and integrating with Azure when we perform our Builds and Deployments. Service Connections are specific to our Project so we’ll at least need a project to exist, from there we can go to Service Connections in Project Settings and add an Azure Resource Manager connection:

Complete the template with your Subscription ID, Subscription Name, Service Principal Client ID, Tenant ID and Service Principal Secret (if you prefer a certificate you can also supply a PEM formatted certificate in base64).

Click Verify to confirm the values are correct and give your Service Connection a name before you Verify and Save, the Service Connection will now be available to use in your Pipelines:

Creating a LogicApp – Visual Studio
I’ve talked previously about how I prefer to use Visual Studio Code, however for these types of solution that require a full build, full Visual Studio is needed, whilst usually a licensed product, the free software Visual Studio Community Edition is always freely available. We will also need the LogicApps plugin for Visual Studio which is also freely available.
Now we’re ready to start building in Visual Studio. Once we launch we’ll be offered to create a New Project and specify where it should live. The Project type is going to be an Azure Resource Group as the deployment will ultimately be bundling everything together and pushing a Resource Group in to Azure:

Create the Solution and select your template, since we have installed the LogicApps plugin, we should now have a LogicApps template:

Upon selecting the template you will be asked to connect to Azure, allowing us to integrate directly with Azure, this is vital for reading variables, however we won’t be publishing to Azure from here as this would defeat the purpose of a flexible pipeline. We don’t want anyone deploying changes from code that only exists on their own laptops!

Now we should have the basics of our Logic App presented in Visual Studio, we can see the contents below the GUI normally presented in the Azure Resource Manager are now exposed:
- Deploy-azureResourceGroup.ps1 – A PowerShell script which handles the deployment
- Deployment.targets – A list which contains deployment endpoints
- LogicApp.json – The JSON representation of the actual Logic App seen in the GUI designer
- Logicapp.parameters.json – The JSON representation of additional parameters which the LogicApp will read at deployment time

In order to start working on this Logic App in the Designer mode, we can just start to work on the LogicApp.json file, as this represents the app itself:

So let’s fast forward, I’ve now built a basic Logic App based on the design outlined earlier, with a REST endpoint listening for a POST, connecting to some BLOB storage:

One point that has lengthy documentation, is how to properly create the JSON schema, we need only provide a sample JSON payload and the schema is automatically generated. Using this we can dynamically take output values and pass them to the next step in the Logic App:
// Example Payload
{
	"account": {
		"name": "tinfoilcipher",
		"uid": "1234567890"
	}
}

// Generated Schema
{
    "type": "object",
    "properties": {
        "account": {
            "type": "object",
            "properties": {
                "name": {
                    "type": "string"
                },
                "uid": {
                    "type": "string"
                }
            }
        }
    }
}
The Logic App is now ready to go as a prototype, and we could realistically publish to Azure from here, but that’s not what we’re here to do, we want this to be an automated release that we can modify later, add additional code to and deploy through a pipeline. So there’s some additional changes we need in LogicApp.paramaters.json:
// Default layout of Logicapp.paramaters.json
{
  "$schema": "https://schema.management.azure.com/schemas/2015-01-01/deploymentParameters.json#",
  "contentVersion": "1.0.0.0",
  "parameters": {
    "logicAppName": {
      "value": null
    }
  }
}
As we see, there is nothing in this file by default, not even a name, these values are going to be critical when it comes to doing an automated deployment as the whole release needs to be unattended. These paramaters are called as variables inside LogicApp.json, so it’s essential that we define them here, otherwise when we create a Release later, the whole thing will fail as our variables won’t actually contain any values. With that in mind, we want to complete this file:
// Updated layout of Logicapp.paramaters.json
{
  "$schema": "https://schema.management.azure.com/schemas/2015-01-01/deploymentParameters.json#",
  "contentVersion": "1.0.0.0",
  "parameters": {
    "logicAppName": {
      "value": "tinfoil_logic_app"
    },
    "logicAppLocation": {
      "value": "uksouth"
    },
    "azureblob_1_Connection_Name": {
      "value": "tinfoil_logicapp_api_to_blob"
    },
    "azureblob_1_Connection_DisplayName": {
      "value": "tinfoil_logicapp_api_to_blob"
    },
    "azureblob_1_accountName": {
      "value": "tinfoilappstorage"
    },
    "azureblob_1_accessKey": {
      "reference": {
        "keyVault": {
          "id": "/subscriptions/55253498-4471-4862-8c23-46325835774c/resourceGroups/tinfoil_logic_rg/providers/Microsoft.KeyVault/vaults/tinfoillogicapp-keyvault"
        },
        "secretName": "tinfoil-logicapp-storage-key"
      }
    }
  }
}
These values will allow for a fully automated release. Pay particular attention that we’re referencing both the Storage Account that we have already created as well as the KeyVault and the Secret nested within it which is going to allow us to read and write to that Storage Account.
Source Control – The Top of the Pipeline
The pipeline only works if your content is in source control, so this content being on our local machine doesn’t really help up, let’s get this data moved up in to a git repo now that we have a prototype and we’ll start to work with it from there.

You’ll see we now have a .sln outside of the main code, this is the Visual Studio solution file which maps the relative locations and runtime configuration of the solution itself, this file is essential for the build.
Creating the Pipeline – Build
Build pipelines can be generates as either raw YAML or using an agent driven GUI process, for these solutions using the GUI is a little friendlier until you understand the fine detail of what’s going on. Creating a pipeline is, predictably, done from the Pipelines section of your project, when prompted for the location of your code, I suggest at this time using the Classic Editor (though this option won’t be around forever as the YAML method becomes ubiquitous):

Using the Classic Editor we are now prompted for a source locations for the Platform, Project, Repo and Branch:

We’ll be asked what Build Template (if any) we wish to use, or if we wish to work with raw YAML:

We could use a .NET Desktop template as it’s almost exactly the steps we want, but it’s easier to create an empty job as we only want a few simple steps. These steps are going to be:
- Build solution (as defined in the .sln file)
- Copy the resulting built files to a staging directory
- Publish the completed built items to the artifacts store, an artifact in this sense is the finished product, the application build ready for deployment
As we see, these steps are represented in the finished pipeline:

Enabling Continuous Integration
One final step is needed before we can consider this true Continuous Integration, within the Triggers tab, we can simply Enable CI:

Critical here is that the trigger is set on a specific branch (or branches), it’s important to understand what’s happening exactly here.
We’re now binding a CI pipeline to the Repository that the Build is being built from, a trigger is set on the build meaning that as soon as a commit is made to any of the files in that repo, a build will take place, effectively creating a new “latest” build. Since you probably want to build from the latest delivered version of the code, we’re now ensuring that the artifact cache is always being populated with the most up to date version possible of your app, from the most up to date code.
This entire pipeline is always still viewable (and can be edited as) YAML after the fact, should you change your mind and wish to edit that way, for example this pipeline can be read as:
pool:
  name: Azure Pipelines
  demands:
  - msbuild
  - visualstudio

steps:
- task: VSBuild@1
  displayName: 'Build solution **\*.sln'

- task: CopyFiles@2
  displayName: 'Copy Files to: $(build.artifactstagingdirectory)'
  inputs:
    SourceFolder: '$(system.defaultworkingdirectory)'
    Contents: '**\bin\$(BuildConfiguration)\**'
    TargetFolder: '$(build.artifactstagingdirectory)'
  condition: succeededOrFailed()

- task: PublishBuildArtifacts@1
  displayName: 'Publish Artifact: output'
  inputs:
    PathtoPublish: '$(build.artifactstagingdirectory)'
    ArtifactName: output
  condition: succeededOrFailed()
Now…We Build
So enough setup, let’s make something…..
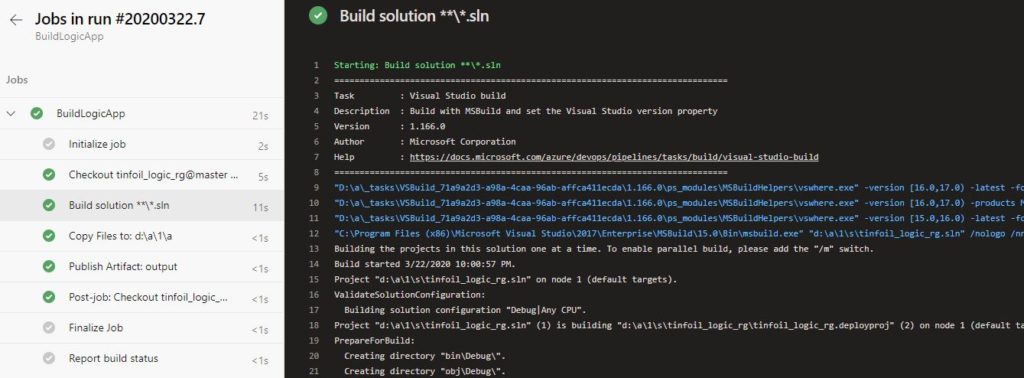
Since we’ve no need to actually modify any source code, we can kick the first build off manually, a few things go on here, each step in the pipeline executes on a temporarily spun up bit of compute within your Azure tenancy, it exists for only as long as the execution of the build and if you’re so inclined you can dive in to the running build to see a console connection to the CLI:

Upon a successful build, we have a cleanly completed job:

We now have an Artifact ready to deploy to Azure. At this point NOTHING HAS BEEN DEPLOYED, all you have is an artifact sitting in Azure DevOps which can now be deployed. We have CI but no CD, not even normal D.
Enabling Continuous Deployment
The next step in the pipeline is the deployment, which will take our artifact and push it to our target platform. For us this solution that’s going to be a straight forward push to Azure.
Further down the Pipeline is Releases and we’re doing to add a Release Pipeline, the final state should look like this:

Our Artifact will be read as the “latest” version from the artifact cache, and has been set to look for the artifact produced by the BuildLogicApp Build Pipeline, it is set to release on a constant schedule only if the source pipeline has been updated, this means that this release will only occur if the upstream build has actually occurred. This allows us to achieve the other side of the coin, Continuous Delivery.
The task which will be executed using this artifact pushes the finished product to Azure by wrapping the entire solution in a Resource Group:

Settings within this task leverage both a template (which will be the original template, post-build) and the Parameters file that we created earlier:

Looking up these files can be done by selecting the … at the end of each field which allows you to browse the artifact structure from the Build:

Just like the Build, the Release Pipeline can also be created and represented in YAML, in our example, our code looks like:
steps:
- task: AzureResourceGroupDeployment@2
  displayName: 'Azure Deployment:Create Or Update Resource Group action on tinfoil_logic_rg'
  inputs:
    azureSubscription: 'tinfoil_principal'
    resourceGroupName: 'tinfoil_logic_rg'
    location: 'UK South'
    csmFile: '$(System.DefaultWorkingDirectory)/_BuildLogicApp/output/tinfoil_logic_rg/LogicApp.json'
    csmParametersFile: '$(System.DefaultWorkingDirectory)/_BuildLogicApp/output/tinfoil_logic_rg/LogicApp.parameters.json'
Now that the Release Pipeline is ready, we can create our versioned release which will be used to deploy to Azure. Click Create Release and complete the wizard:


Clicking Create will create the Release and the pipeline is complete, as no additional source code change is expected, the artifacts are not going to change and the first release will need to be manual, this will start the release:

We can look at the tasks executing in sequence if we click in to the task:

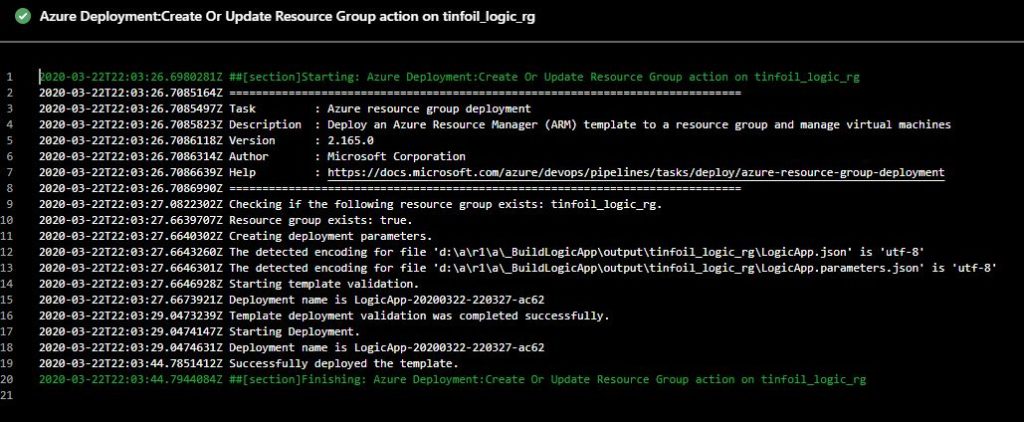
Much like the build pipeline, we can dive in to the console to see the steps take place in realtime on the console:

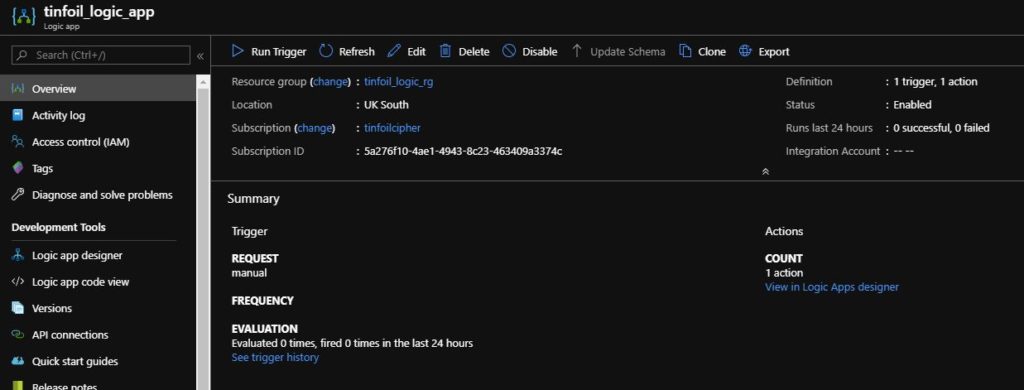
Finally, if we now look at Azure, we can see that the final resource has indeed been deployed, with the added benefit that any code changes made at source are mastered in our git repo and can be controlled through a solid integration and release process:

Conclusion
This is all really just scratching the surface but hopefully provides a starting point, a lot of these points I found were covered in some manner elsewhere but didn’t really go enough of the way to explain a lot of the fine points, particularly the setup and interplay of components.
There is A LOT MORE to this, we didn’t even look at testing, maybe one of the most vital steps that should really sit in between build and deploy, there’s no reason to deploy your build if it fails automated testing, but this post is already long enough.
There’s also a whole load of other amazing features that pipelines offers that can be looked at in other posts (integration with IaC tools like terraform and ansible to deploy entire infrastructures through CI/CD, integration with Boards and Jira to update workflows for releases, handling secrets from other platforms, handling native variables, multi-staged deployments to allow staging before release.
This really is the tip of the iceberg, the game is changing, time to get out and learn it!